DISTANTSTUDIO
User Guide
Distant Studio has been created to be as simple to use as possible. Basically just enter the address you want to connect to and click the jack connector.
There are however a few things to explain to get the maximum out of Distant Studio.
INSTALLING
There is a choice of two installers. One for Windows and one for Apple Macintosh systems. Either will let you choose what to install (plugin and/or the stand-alone application) and where.
There are two versions of the plugin. A regular version (FX) and an Instrument version. In most cases you would use the regular plugin, but in some hosts an instrument is required. Mind that, being an instrument, this version can only receive and not send (since it does not have an audio input).
FIRST TIME USE
 Upon starting Distant Studio for the first time you will be presented with the registration screen. Here you will have the option to use the full-functioning, 30 day, Demo or press Get Key to request a license (which will be provided for free during the open beta upon subscribing to the news-letter).
After receiving your license key you can enter it here and press Register.
THE MAIN INTERFACE
The main screen of Distant Studio consists of 5 sections:
1. Toolbar
![]() On the top is the toolbar. Clicking on the logo will get you back to the main screen. On the right side are two buttons. The cog-wheel for Settings and the Info button to go the the about screen.
On the top is the toolbar. Clicking on the logo will get you back to the main screen. On the right side are two buttons. The cog-wheel for Settings and the Info button to go the the about screen.
2. Main panel
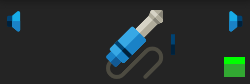 Below the toolbar is the main panel.
To connect (or disconnect) click on the big jack Connector.
On the left and right are the in- and output Meters. Clicking on the Speaker icon above them will mute or un-mute the respective channel.
3. Transmission settings panel
![]() Distant Studio can be either a transmitter or a receiver. Here you can select, with the Mode toggle*, which you need.
Distant Studio can be either a transmitter or a receiver. Here you can select, with the Mode toggle*, which you need.
When working as a transmitter the IP address of the receiver you want to connect to must also be set (or will default to localhost to enable local connections). *The instrument version can only be a receiver.
;4. Message panel
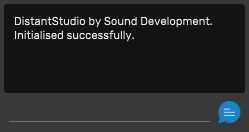 This panel displays the status messages from Distant Studio and chat messages from any connected clients.
At the bottom is the Chat Box, where you can send messages yourself.
Due to the resize-able nature of the interface; at it’s smallest; the Message Box is not visible, just the chat box. Just enlarge the interface (see Status Bar) and the messages should appear.
5. Status bar
![]() The Status Bar shows the amount of the transmission buffer used. When Distant Studio is in Receiver Mode you can also set the amount of buffering you want by moving the slider which appears over the buffer meter. Smaller buffers will lead to less latency, but if set too small it might glitch on less stable connections.
The Status Bar shows the amount of the transmission buffer used. When Distant Studio is in Receiver Mode you can also set the amount of buffering you want by moving the slider which appears over the buffer meter. Smaller buffers will lead to less latency, but if set too small it might glitch on less stable connections.
On the right side is the Connection Status indicator. This lights up when there is a connection.
On the bottom right the Resize Handle can be used to resize the interface.

SENDING AUDIO
To be able to send audio you have to set Distant Studio in Transmitter Mode and enter the IP address of the receiver (pressing the triangle on the right opens up a list of previous receivers). After this, simply click the big jack Connector to connect.
If the receiver is active and the input is not muted (it is by default to avoid feedback), the audio at your selected input (stand-alone) or the track you have inserted the plugin on, will be sent. The sample-rate of the transmitter and the receiver have to match however.
Chat messages can also now be sent with the Chat Box.
RECEIVING AUDIO
To receive audio on a local network simply put Distant Studio in Receiver Mode and wait for the transmitter to connect.
When the transmitter is anywhere else in the world you (the receiver) will have to supply your external IP address to the receiver.
In addition to this, the port of communication has to be forwarded to your computer. Please refer to the section about ports for more information on the subject.
WHAT IP ADDRESS?
There are three different scenarios influencing the IP address of the receiver is:
1. To the same computer
When connecting to another instance of Distant Studio on the same computer (to connect one DAW with another by example) you can leave the address empty (or enter “localhost“).
When you want multiple connections on the same computer, you can give each connection a dedicated port to communicate over (set a custom port in Settings).
2. To a computer on your local network
On a local network (your home/studio) you can enter the computer name or the local IP address of the receiver (find out what your local IP address is here).
3. To a computer anywhere around the world
![]() To connect to any computer around the world you will have to enter the external IP address of the receiver.
To connect to any computer around the world you will have to enter the external IP address of the receiver.
The receiver can find out what this is by clicking Check my IP address on-line… or here.
PORTS
When the IP address is supplied a connection can be made using a specific port. Like an audio channel this enables you to make multiple connections (using multiple ports) to the same computer. The default port is 52713, but in the Settings Screen this can be set to anything within 49152-65535. You have to make sure the transmitter and receiver are on the same port for a successful connection.
Port forwarding.
To connect to a computer outside of your local network, your router needs to send the audio to the correct computer (running the receiver). To achieve this you have forward the port to the local IP address of the receiver. There could be some security risk with leaving this port open, so it might be wise to close it after use. This is, however, the only way to avoid having to involve a 3rd party server, with it’s subscription rates (using a direct p2p connection between the receiver and the transmitter).
There are many different brands of routers, so also many ways to forward a port. But as a general guide:
- Sign in to your router wireless settings as admin.
- Now start locating the option for port forwarding.
- Type the port number or port range you are willing to forward.
- Select the TCP protocol (or TCP/UDP).
- Now type the local IP address of the computer running the receiver.
- Finally, enable the port forwarding rule by applying these settings (Save or Update, etc…) and possibly restarting the router.
A more comprehensive guide can be found here.
SETTINGS
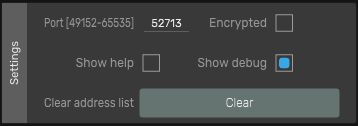 Pressing the cog wheel at the Toolbar will give you the Settings Screen. Here you can specify:
- The Port you want to use.
- Whether you would like the connection to be Encrypted (using a Blowfish block cipher) or not.
- Enable tooltips by selecting Show Help.
- Show Debug will give you more feedback in the Message Box. This can be helpful to troubleshoot any problems.
- Clear Address List clears the list of previous receiver IP addresses.
AUDIO SETTINGS
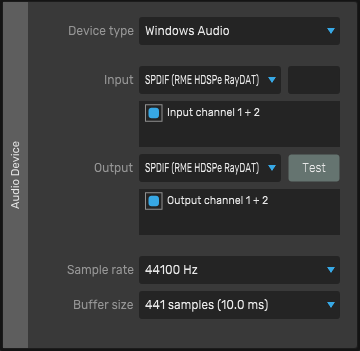 In the stand-alone version of Distant Studio you can also set the Audio Settings in the Settings Screen.
On Windows machines you start with the option to select your Device Type (ASIO, Windows Audio (WASAPI), DirectSound ).
Input let’s you select an input device and channel and Output let’s you select an output device and channel (Test gives you a signal to check if it’s working, so make sure your speakers are not too loud).
Next Sample Rate let’s you set the sample rate. Important to note is that the receiver and transmitter need to have the same sample rate.
Finally there is Buffer Size. Low values will improve latency, but might introduce glitches or dropouts.